
What is Bleed in Printing?
Bleed is the extra image or colour that extends past the final size of your printed product. When we print and cut your artwork, tiny movements can happen during trimming. If your design stops exactly at the edge, thin white lines can appear around the finished product. Adding bleed prevents this and gives you a clean, edge-to-edge result.
The Short Answer
- Add 3 mm bleed on all sides
- Extend backgrounds and images into the bleed area
- Keep text and logos away from the edge
- Export your file as a PDF with bleed included
This format gives us exactly what we need to print your job correctly and efficiently.

Document set up with no bleed
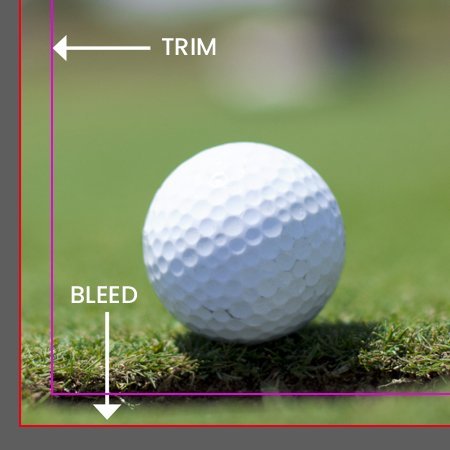
Document set up with 3mm bleed

Exported PDF with bleed and crops
How much bleed do I need?
We recommend 3 mm bleed on every side.
This means:
This means:
- Your artwork should be 3 mm larger on each edge than the final trim size.
- Any background colours, photos, or patterns must extend fully into this area.
Example
If your finished flyer is A5 (148 × 210 mm), your artwork should extend to 154 × 216 mm.
If your finished flyer is A5 (148 × 210 mm), your artwork should extend to 154 × 216 mm.
What happens if I don’t add bleed?
Without bleed, your print may:
- Show unwanted white edges.
- Look uneven or poorly finished.
- Need changes before we can print, which can cause delays.
Adding bleed avoids these issues and delivers the best finish.
Bleed vs trim vs safe area
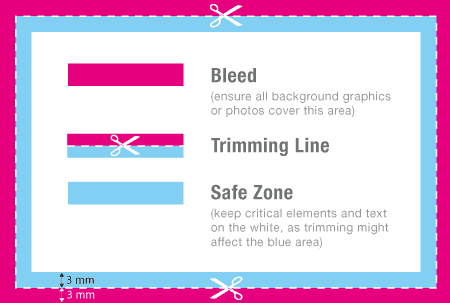
Trim line: where the product is cut to its final size.
Bleed area: the extra 3 mm outside the trim. Backgrounds and images should reach this edge.
Safe area: the space inside the trim where text and logos should stay.
Bleed area: the extra 3 mm outside the trim. Backgrounds and images should reach this edge.
Safe area: the space inside the trim where text and logos should stay.
Keep text inside the safe area
To keep important content clear and readable:
- Keep all text, logos, and key details at least 5 mm inside the trim line.
- For larger items like banners, increase this to 20 to 25 mm.
Text placed too close to the edge can look cramped or uneven once printed.
How do I add bleed to my file?
If you do not have a print-ready PDF, we also accept:
Adobe Illustrator
- File → New
- Set 3 mm bleed on all sides in Document Setup
- Extend artwork to the bleed edge
- Export as PDF with bleed enabled
Adobe Photoshop
Photoshop does not have a bleed setting. Instead:
- Make your document 3 mm bigger on all sides.
- Example: A4 (210 × 297 mm) becomes 216 × 303 mm.
- Keep important content away from the edges.
- Export as a PDF.

Adobe InDesign
- File → New Document
- Open Bleed & Slug
- Enter 3 mm on all sides
- Extend backgrounds to the bleed line
- Export as PDF with bleed and crop marks
Common mistakes to avoid
- Backgrounds stopping at the trim line
- No bleed included in the PDF
- Text or logos too close to the edge
- Crop marks added but no bleed
Avoiding these helps your order print without delays.
Don’t worry, we check your files
- Our team checks artwork before printing
- We’ll contact you if there’s an issue
- Following this guide helps avoid delays and rework
Need help with your artwork?
If you’re unsure whether your file is set up correctly, contact our team before ordering. We’re happy to help.
